Numerous inventions of the 19th - early 20th centuries radically changed ...

Have you ever thought that the yield of your dacha will depend on the shape of the greenhouse? No, we are not talking about the length, width of the building - we are talking about its shape. The pyramid greenhouse has long been known to experienced gardeners as a design that really increases productivity. And indeed, the fact remains - plants grow much better in a structure of just this shape. Therefore, today we will talk about how to create a greenhouse-pyramid on the site with your own hands.
Even the ancient Egyptians knew that buildings in the form of pyramids have unique properties - in them (pyramids) any objects are better preserved, and the state of health improves. Reduced copies of the pyramid of Cheops have healing properties, structures in the form of such polyhedrons help a person achieve harmony and have a host of other unique properties.
On a note! It is believed that at a temperature of -30 degrees, the water in the pyramidal structure does not freeze, and the meat left in it does not rot.

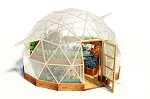
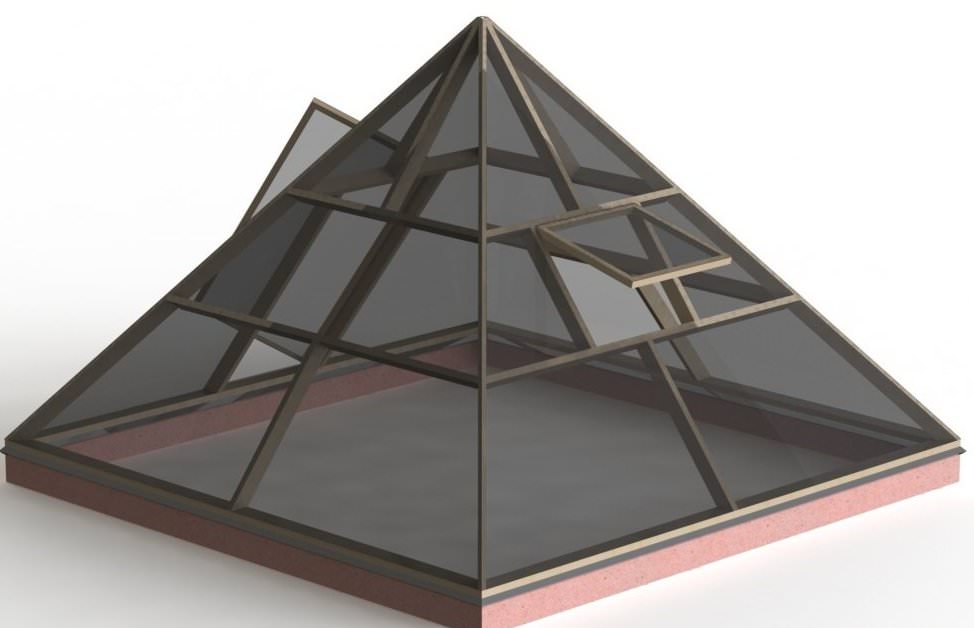
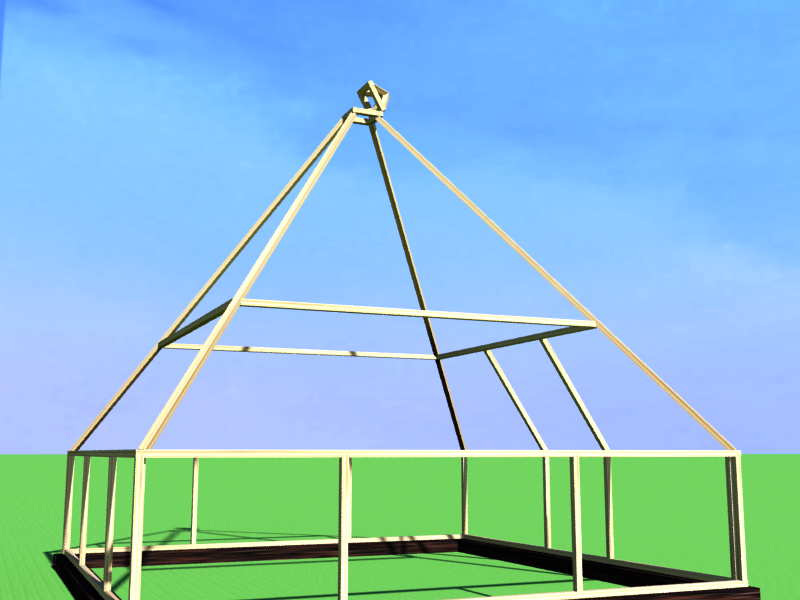
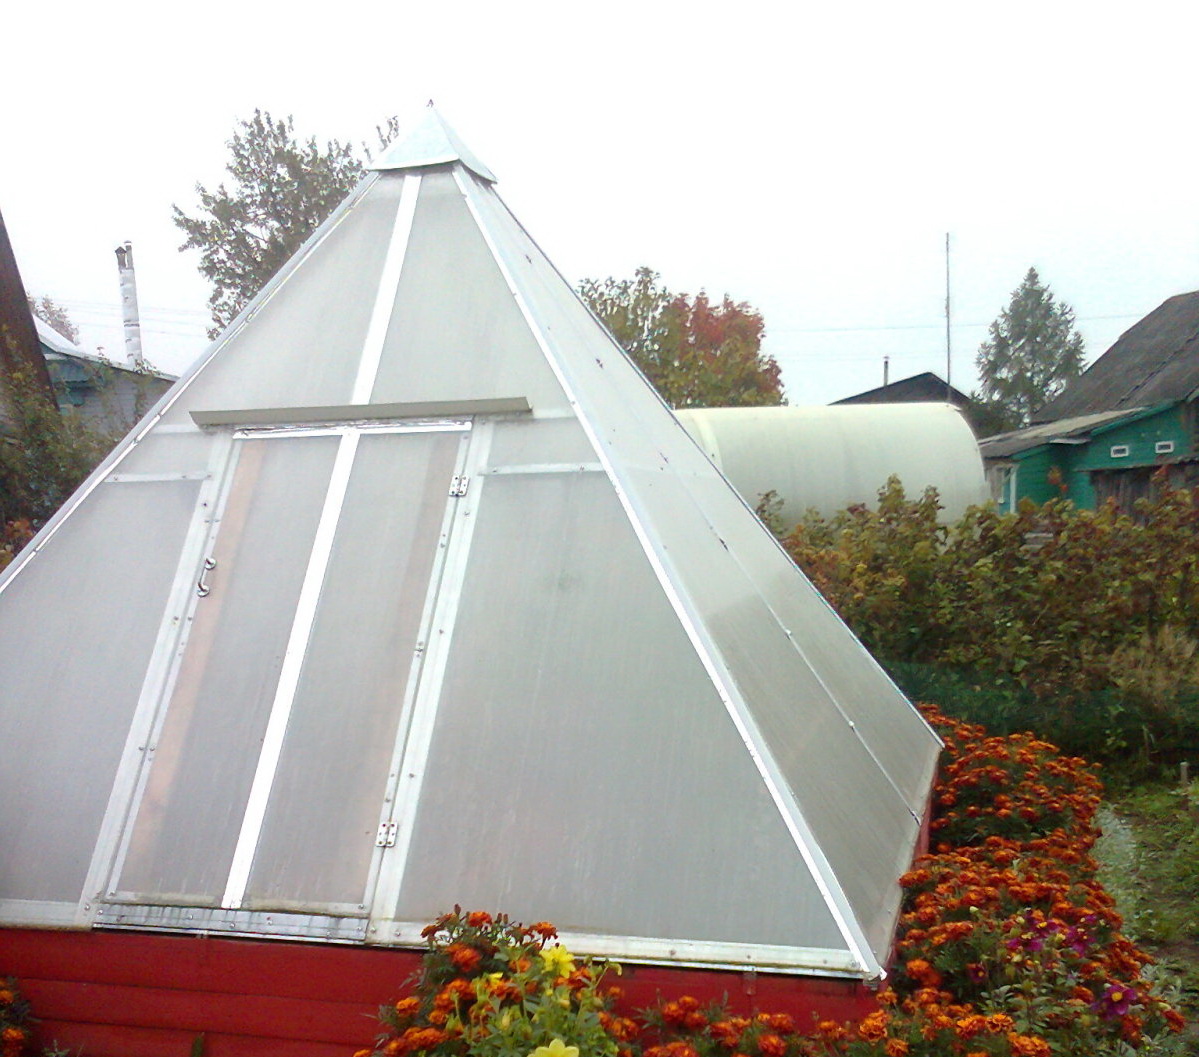
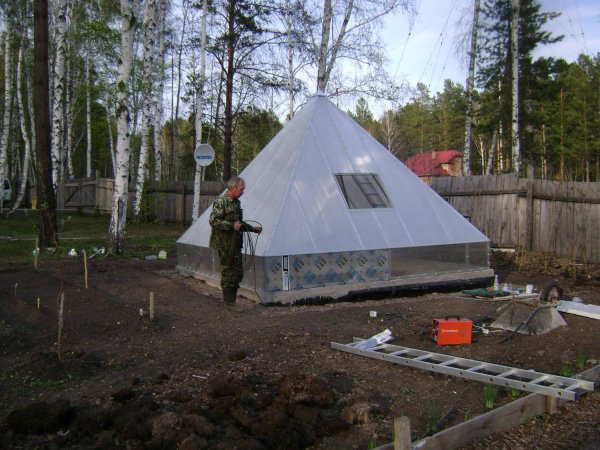
A pyramid greenhouse is a structure that does not differ in functionality from other greenhouses, but has an unusual shape. Its base is an equilateral square with faces of a certain length, and the frame edges converge at the top strictly above the central point of the base. The entrance is necessarily located on the north side - the greenhouse-pyramid is placed taking into account strict orientation on the ground.
In pyramid greenhouses, plants develop faster and better, practically do not get sick, give tasty and large fruits. Moreover, if a dying plant is placed in the structure, it will come to life again, recover and even bear fruit. Unbelievable, but true, and so far no one has been able to refute this information. In the pyramid it is very good to grow seedlings, germinate seeds.
In order for the pyramid greenhouse, which you, impressed by this information, decided to install on your site, to work, it is necessary during construction to strictly maintain the ratio of the sizes of all its parts. This is the width and length of the base, the height of the structure, the length of the ribs and the orientation of the building on the ground.
The frame of the greenhouse is installed on a foundation, most often tape, and can be made of wood or metal. Cover the greenhouse-pyramid with absolutely any covering material. In recent years, it has been increasingly used for these purposes as the most successful option. It is strong and lasts for many years with careful handling.
In addition to the unproven, but real properties of the greenhouse-pyramid, it also has proven advantages. Let's consider them in more detail.
The pyramid greenhouse has one drawback that pales against the background of all its advantages - this is its small area, which will not allow growing too many plants in it. And at a low height of the structure, it will be inconvenient for a person working in it to move.
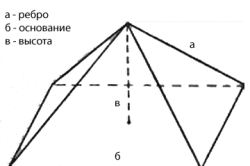
In order for the pyramid greenhouse to receive all the properties described above, it must be built according to a special system, taking into account accurate calculations. Otherwise, it will be an ordinary pyramid, which, of course, will decorate the garden plot, but will no longer have all the unique properties that the so-called " golden ratio» - the ratio of the diagonal of the base of this polygon to its height (equal to 0.62). So, what size should be the correct greenhouse-pyramid?
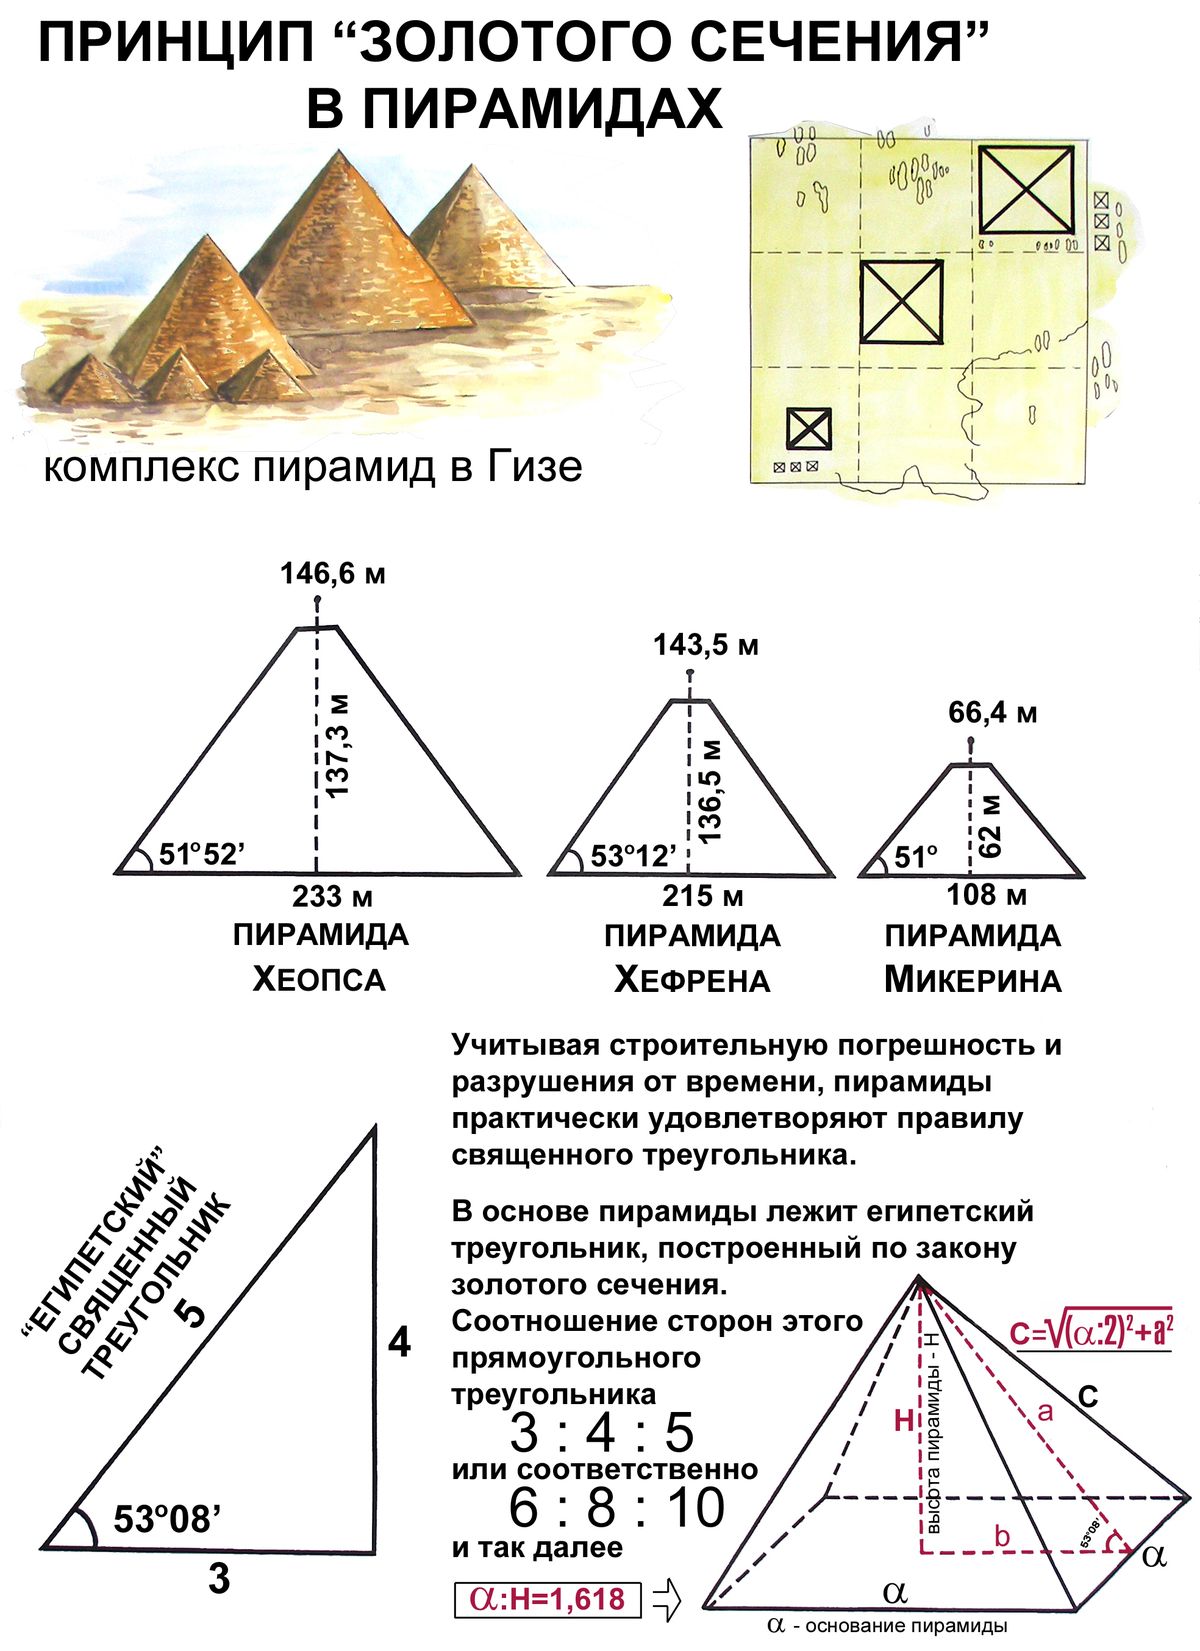
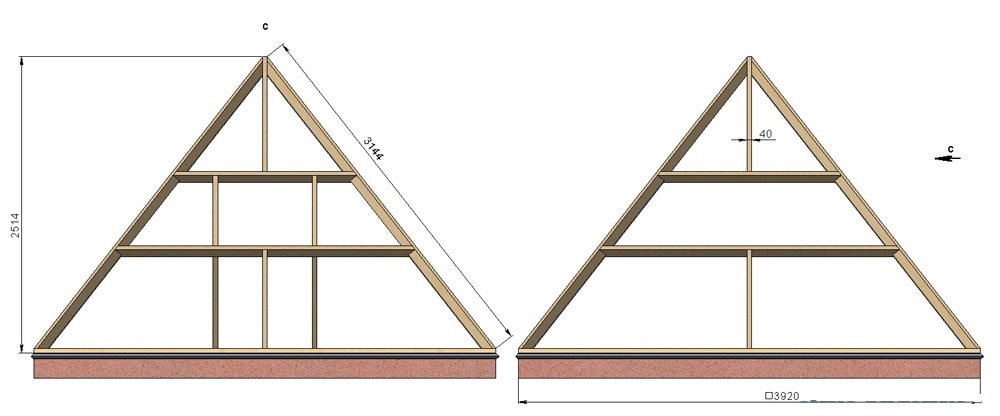
In theory, such a pyramid can have absolutely any parameters, but the height and length must be in strict proportion. The length of the base edge must always be 1.57075 times the height of the structure. It is with this ratio that one can achieve that very ideal “golden section” of the pyramid.
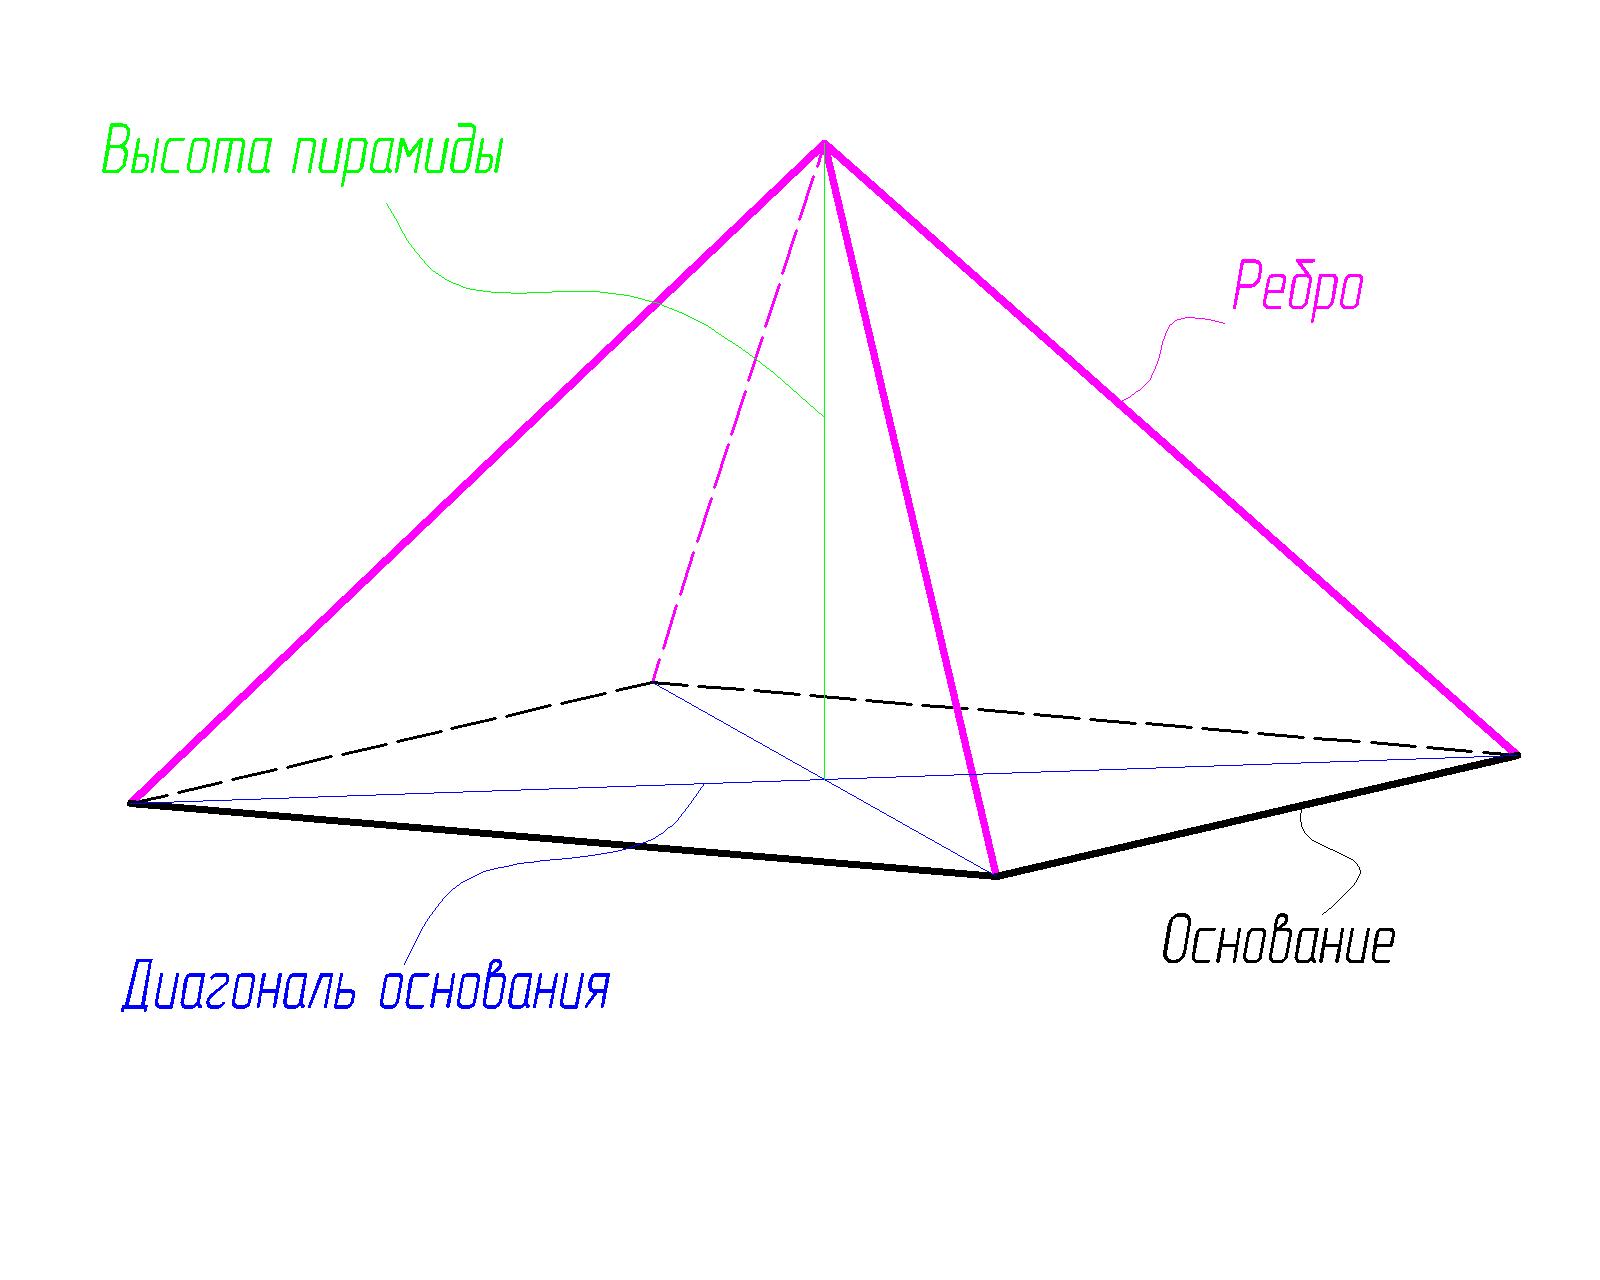
The height of the polygonal structure will be equal to the length of the line perpendicular to the surface of the earth, visually drawn from the point of the top of the polygon to the very center of the base, which is easy to find - just draw lines connecting the corners of the base square diagonally. The point of intersection is the center.
It is interesting that the higher the pyramid, the stronger all its unique properties “work”. Therefore, if possible, do not skimp and make the building bigger.
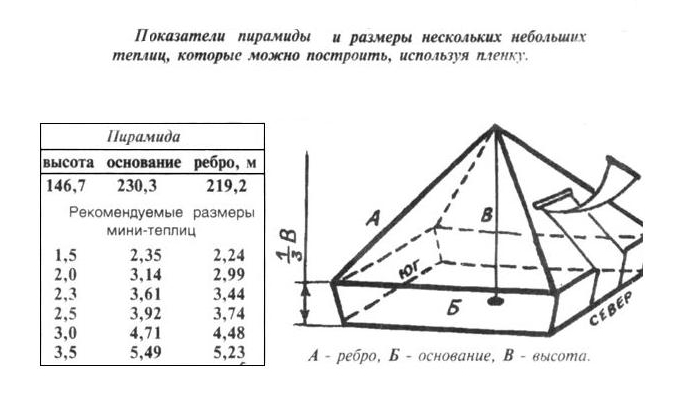
To get the length of the base of the greenhouse, you must multiply by 1.6 the height of the structure you have chosen. But the height of the side face or apothem (the length of the part of the frame that comes out of the base and connects to other parts above the center of the base) can be calculated by multiplying the selected height of the greenhouse by 1.4945.
Advice! Even at the design stage, remember that the height of the pyramid greenhouse should be sufficient to carry out work in it - keep in mind that its walls are inclined at a certain angle.
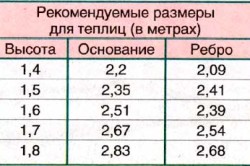
Table. Dimensions of greenhouses-pyramids.
| Height, m | Base rib length, m | Rib length, m | Covered soil area, m2 |
|---|---|---|---|
| 1,5 | 2,35 | 2,24 | 5,5225 |
| 2 | 3,14 | 2,99 | 9,8596 |
| 2,5 | 3,92 | 3,74 | 15,3664 |
| 3 | 4,71 | 4,48 | 22,1841 |
| 146,7 | 230,3 | 219,2 | 53038,09 |
For comparison, the last line of the table shows the parameters of the Cheops pyramid. Many build a greenhouse in their summer cottage with the following parameters: height 3.2 m, length of the base edge - 1.42 m, and its diagonal - 2 m. Then just the ratio of the diagonal of the base to the height of the structure will be equal to the "golden section" 0.62 .
It is also very important to choose the right place for installing a pyramid greenhouse in a summer cottage. It is desirable that it be on a slight elevation, be even, and there are no power lines, embankments, or concrete buildings nearby. Be sure to use a compass to determine the cardinal points and make an exit from the greenhouse strictly in the north direction.
A domed greenhouse or, as it is called differently, a geo-dome, is a spherical structure that resembles a huge hemisphere. The structure is built by carefully connecting many triangular or hexagonal segments. Read more.
As for the materials for creating a pyramid greenhouse, there are not as many of them as it seems.
Tools for building a pyramid greenhouse:
How to build a pyramid greenhouse in your summer cottage? By following the instructions below, this is easy and simple to do.
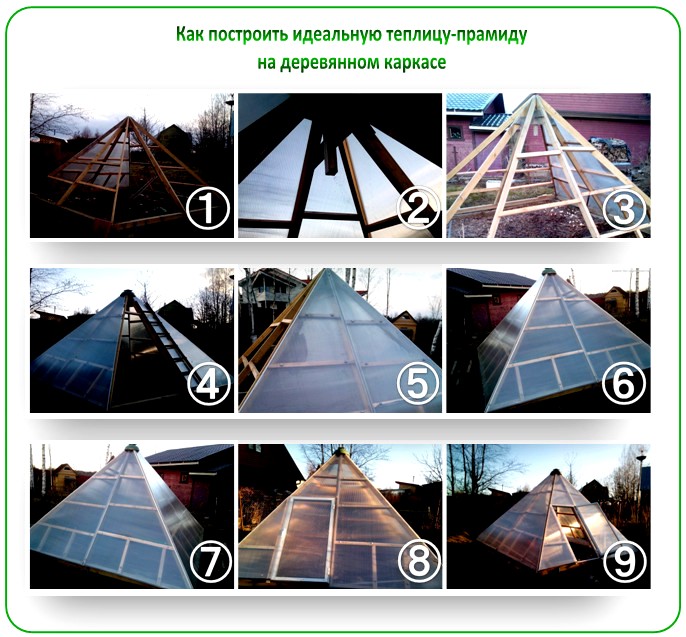
Step 1. Develop a project - in other words, draw a diagram of the structure that you want to receive, and calculate all its parameters.

Step 2 Select a site for building a greenhouse. Mark it for the future greenhouse, estimating its location in accordance with the size of the base and cardinal points.

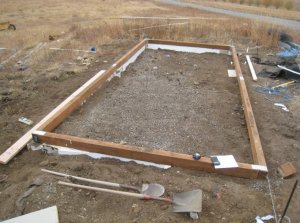
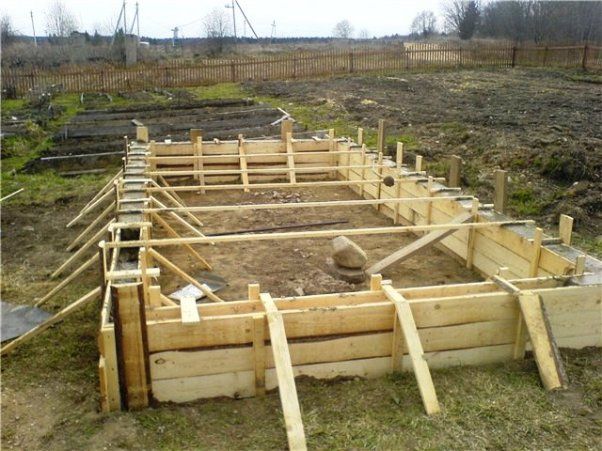
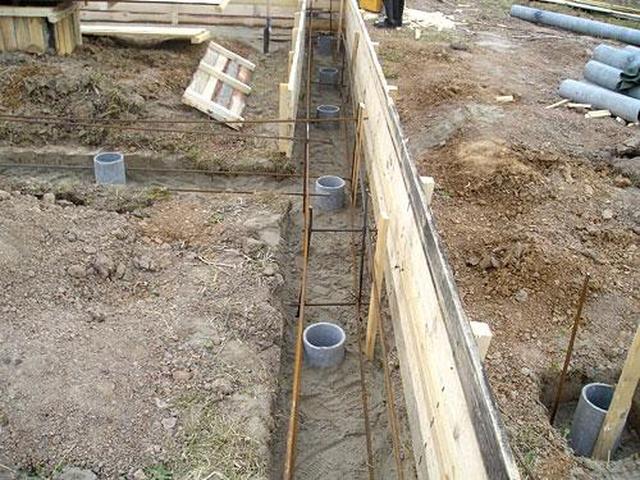
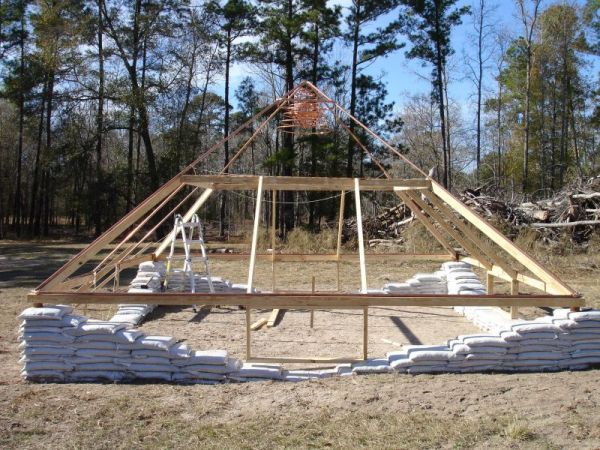
Step 3 Begin work by installing a strip foundation. To do this, dig a shallow trench about 30 cm deep, place a mixture of sand and gravel on the bottom - this will be a sand cushion. Then build the formwork on the ground along the edges of the trench. Prepare a concrete mixture of cement, gravel, sand in a ratio of 1:5:3 and pour it into the trench and formwork. Let the foundation dry well for a few weeks (3 or 4).
On a note! The pyramid greenhouse is a lightweight structure, and it can be installed without a foundation, simply by fixing it in the ground. But for the construction to be capital, the foundation is required. For those who don't need it, step 3 can be skipped.
When the foundation is ready, lay the waterproofing (for example, roofing material) and begin to mount the base.
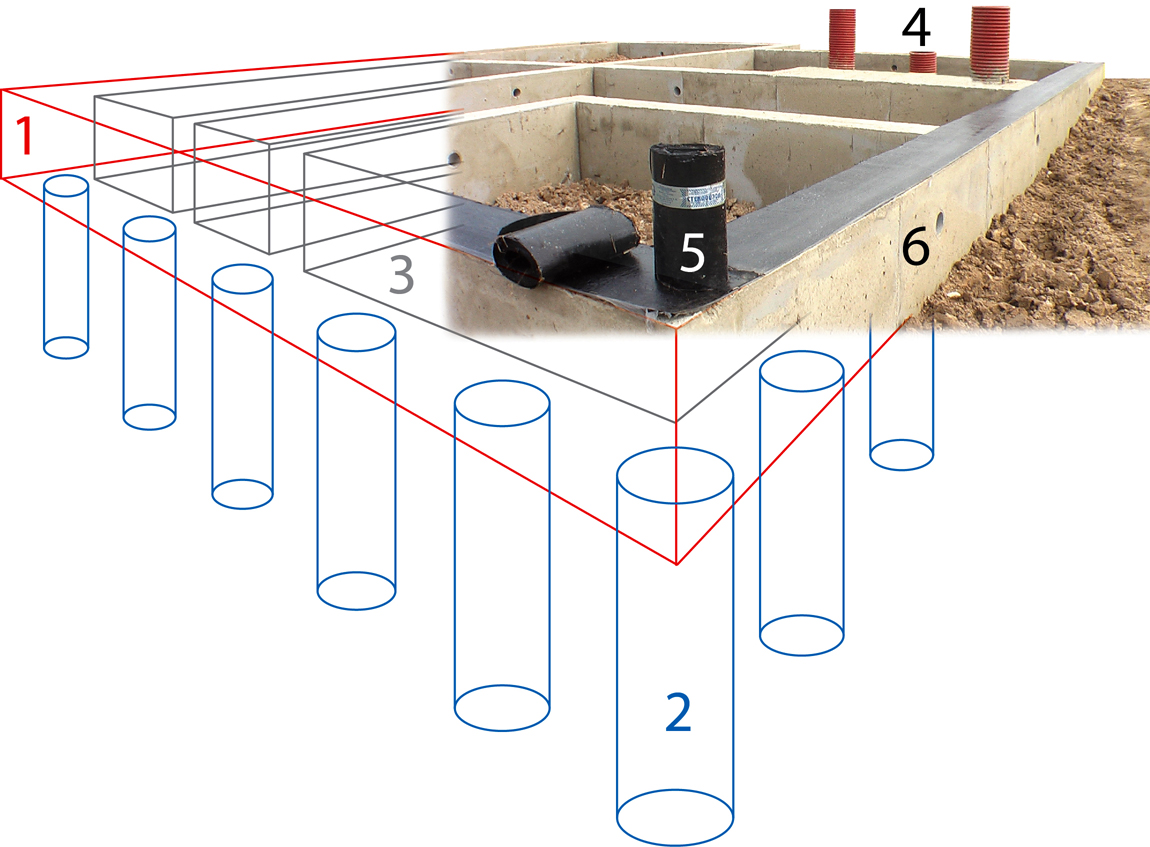
If the soil is loose and there is a possibility of strong shrinkage, then make a pile-tape option. To a depth of about 30 cm, dig a trench 20-30 cm wide. Drill pits 1 m each in the corners, and then set up the formwork. Place asbestos-cement pipes in the pits (you can make the latter yourself by folding the roofing material in several layers). Next, make a pillow, as in the previous version, perform reinforcement and pour concrete.
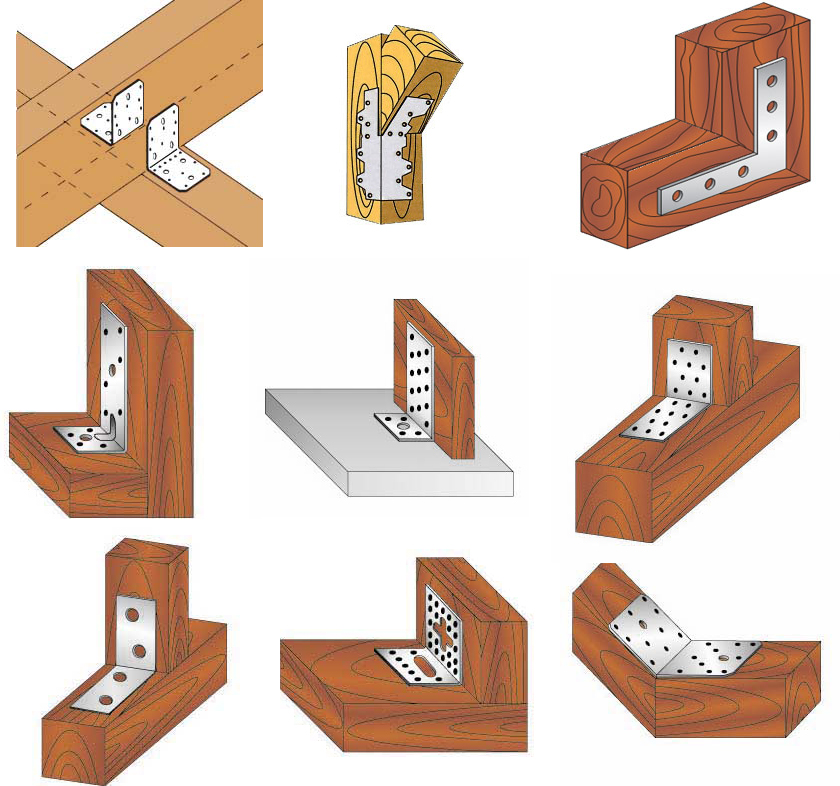
Step 4 Proceed to the creation of the greenhouse itself. Start work by laying and securing the support beam to the foundation or ground. You can connect the beam with the help of corners and self-tapping screws.
Advice! Be sure to treat all wooden parts of the pyramid greenhouse with protective agents so that they do not rot and serve as long as possible.
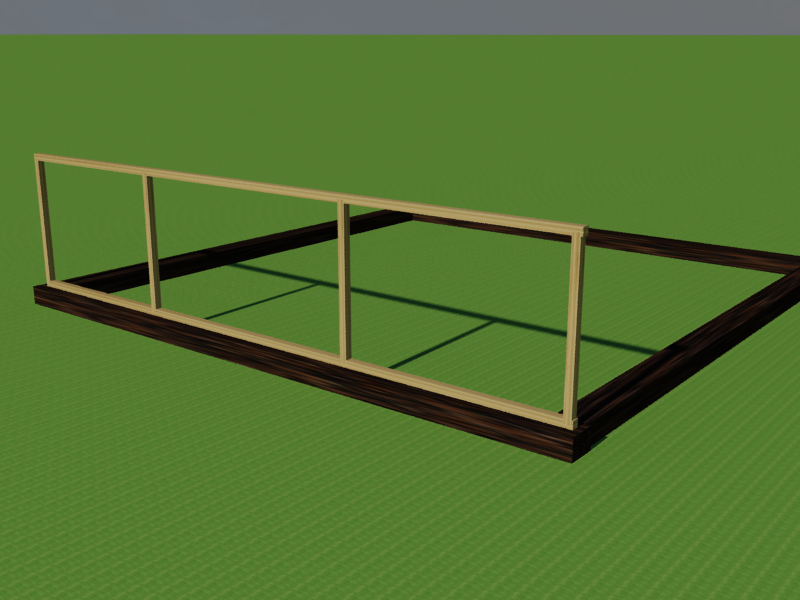
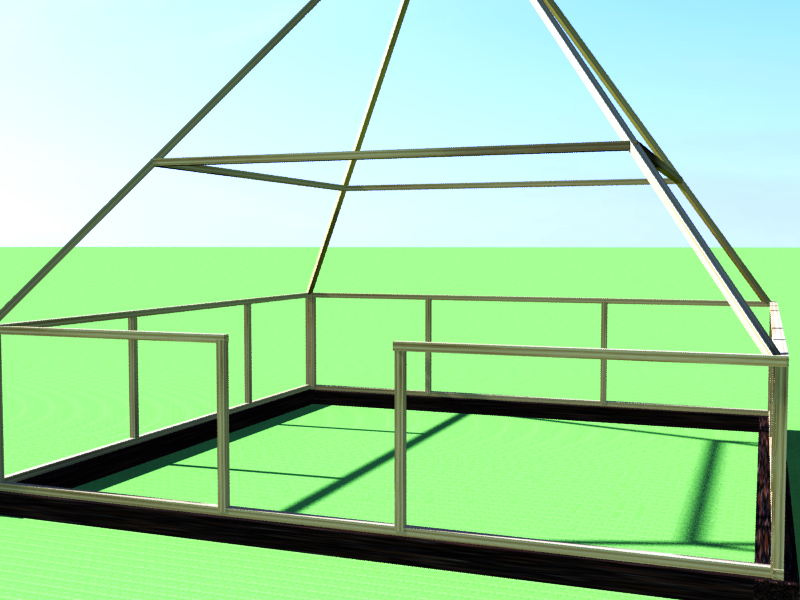
Step 5 To make the greenhouse somewhat taller and more comfortable, you can make low frames that will be located between the base and the pyramidal roof and become part of the walls. Make a frame of bars with a height that allows you not to violate the "golden section" (about 50 cm). There should be three such frames.
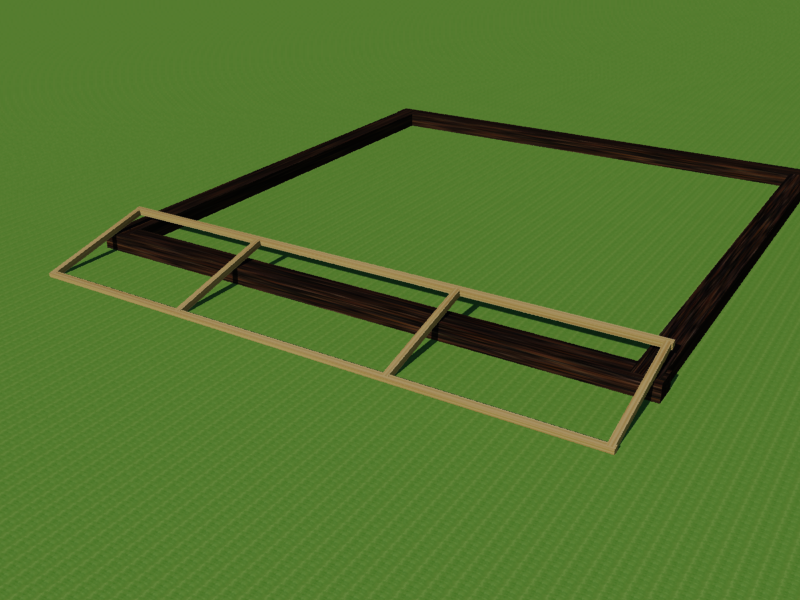
Step 5 Install the frame on the base beam. You have the base frames on three of the four sides of the future greenhouse. There will be a door on the fourth side in the future.
Step 6 Now get ready to install the edges of the pyramid. You have four of them. Take two of them and fasten them in diagonally opposite corners so that the elements meet at the other ends above the center of the base. At the same time, fasten the timber in the lower parts so that it can move freely enough.
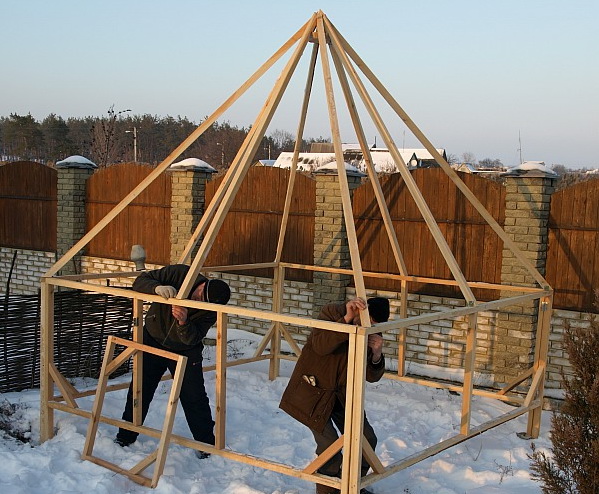
Step 7 Install the two remaining timbers in the same way as in step 6.
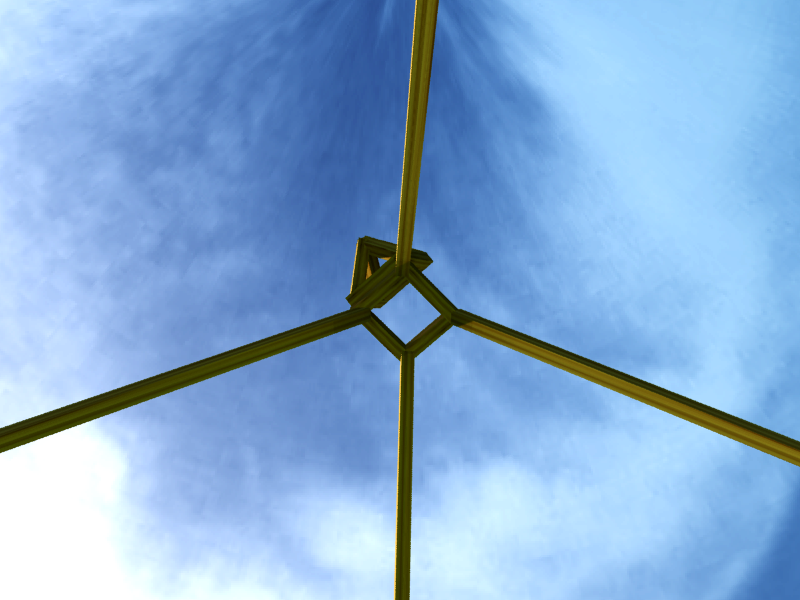
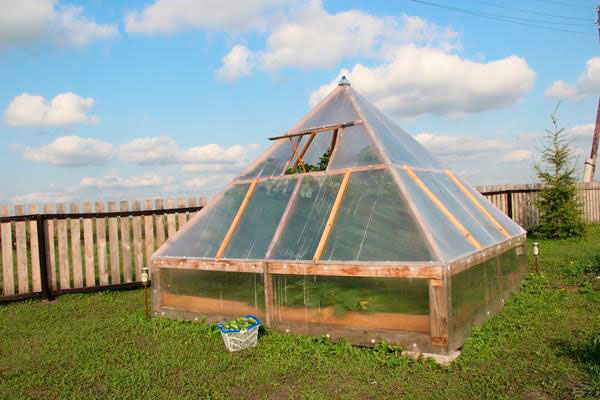
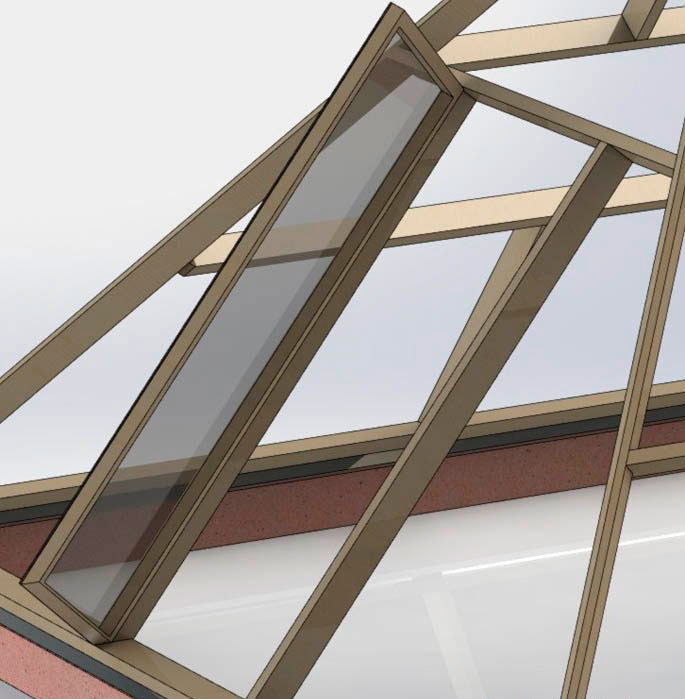
Step 8 Make a small square of thin bars - this will be a ventilation window. Fasten it between the joining bars at the top of the future greenhouse.
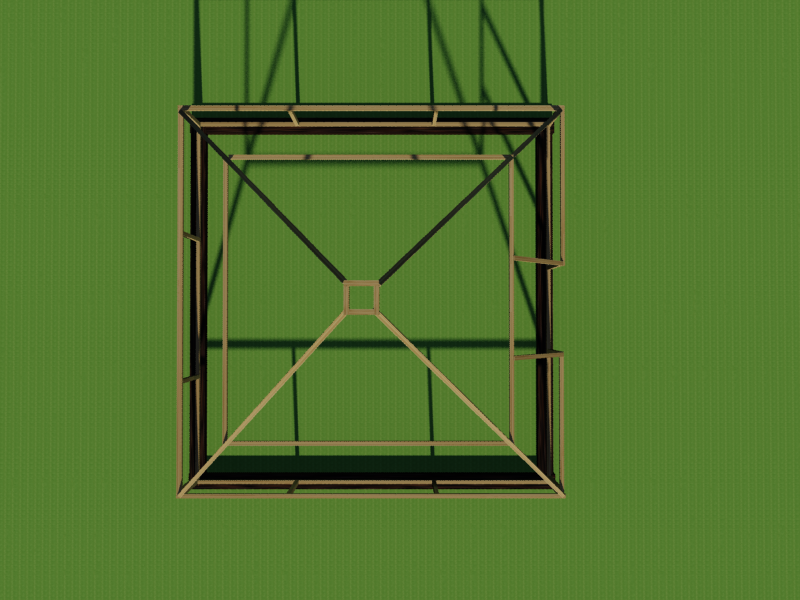
Step 9 Connect the bars to each other on three sides with spacers. This will give the structure strength and prevent the pyramid from falling apart.
Step 10 Mount the doorway and attach it to the wooden base, and with the help of spacers - to the ribs of the pyramid from the side where you did not make the frame.
Step 11 Make a small pyramid out of the bars with a base the same size as the top vent. Install this base with awnings.
Step 12 Secure all loose parts of the greenhouse frame. By the way, it is best to connect all the details to each other using the same metal corners and self-tapping screws.
Step 13 Make and install a greenhouse door.
Step 14 Cover the greenhouse with polycarbonate sheets, fixing them to the frame with self-tapping screws and washers. It is best to close the polycarbonate joints with some corner so that the greenhouse becomes tighter and does not release heat.
Step 13 Install handles and hooks. Consider how the ventilation window will open and close, mount this system.
Step 14 Arrange beds inside the greenhouse. Usually they are equipped around the perimeter, but if dimensions allow, then one additional bed can be made right in the center of the structure. On the walls of the greenhouse, you can arrange hooks for hanging pots or small shelves for plants.

As we can see, the construction process itself is quite simple and fast. Now you just have to try out the greenhouse in practice and enjoy an excellent harvest in the fall.
A polycarbonate greenhouse creates optimal conditions for growing vegetable and flower seedlings, seedlings and vegetables, protecting them from the negative effects of the environment: sudden temperature fluctuations, gusts of wind, drought or long heavy rains, pests, fungal diseases. This article is devoted to how to build a pyramid-shaped polycarbonate greenhouse and what are its advantages not only for plants, but also for human health. To help those who want to build it with their own hands - detailed drawings.
The construction of a greenhouse begins with calculations to determine its size.
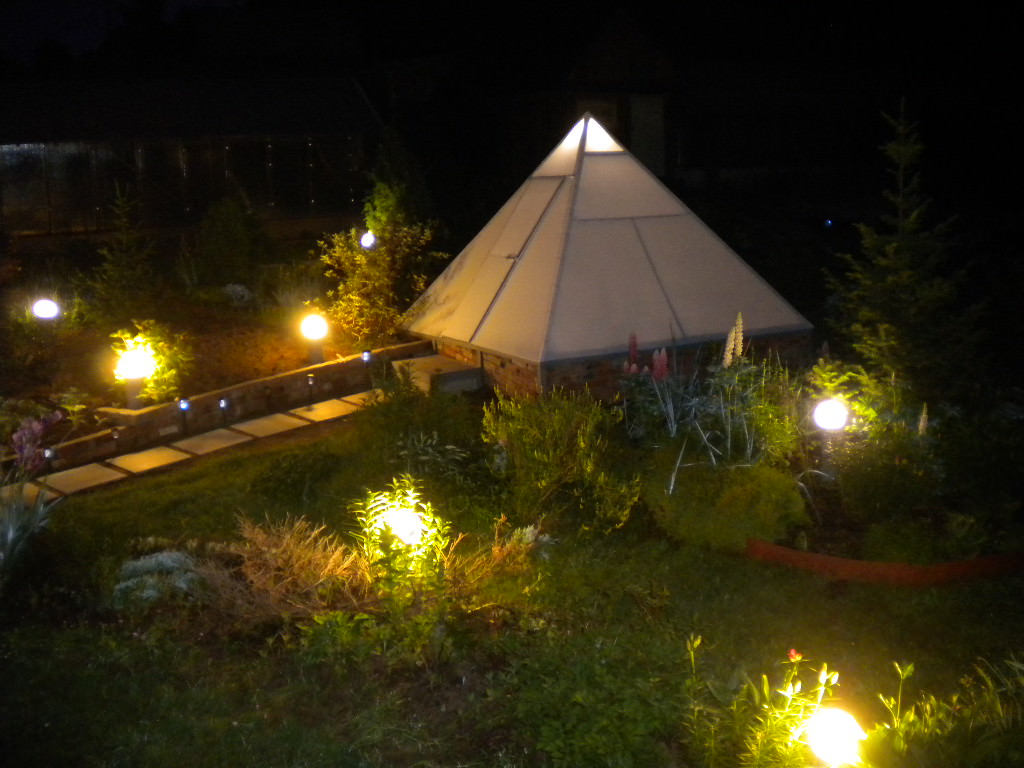
An example of a pyramid greenhouse with a base
Attention! It is not difficult to check the correctness of the calculations even at the planning stage. To do this, the diagonal of the base of the structure should be divided by its height, if the result is the number 0.62, then the calculations were carried out correctly.
The construction of a greenhouse structure consists of several stages:
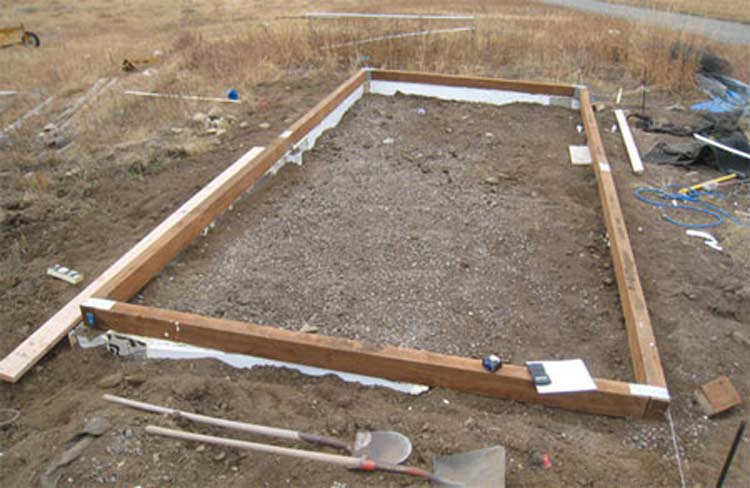
1. Choosing a place for the future greenhouse device - it should be even, without holes and bumps. If there are any, the surface must be specially prepared: level the bumps, and fill the pits.
2. Mark the base of the future structure, taking into account the calculations.
3. At the point of intersection of the diagonals of the base, install the central support of the future structure of the greenhouse-pyramid.
Attention! For the central support of the future pyramid, a beam with a length should be used: the planned height of the greenhouse + 40-50 cm (by this value, the beam should be deepened into the soil, which will ensure the stability of the structure).
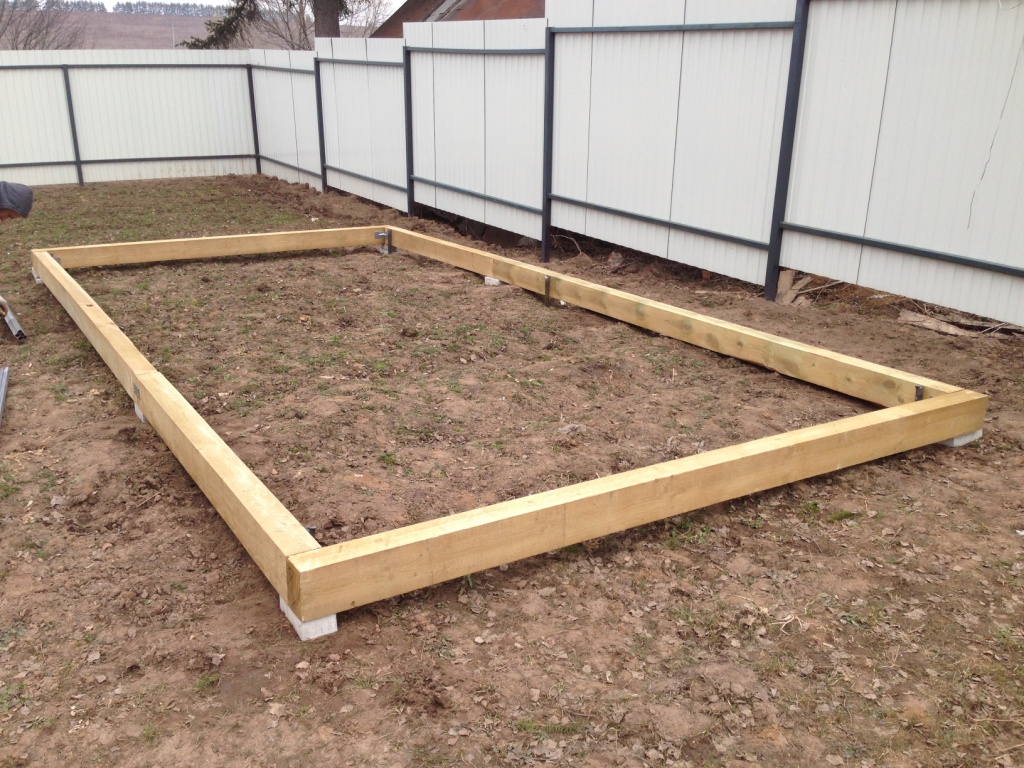
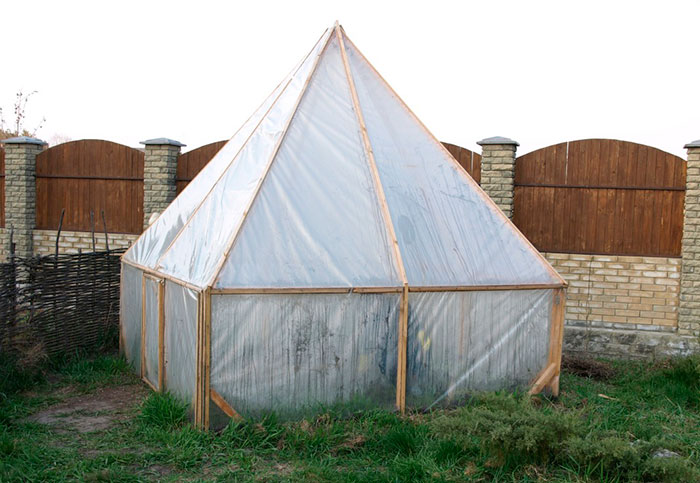
4. In the corners of the pyramid, dig 4 bars about 50 cm high and sew up the base of the future greenhouse along the perimeter with a tree, while not forgetting about the door, the frame of which must be placed on the south side of the greenhouse.
5. Using wooden beams or metal corners, connect the base of the pyramid (corner beams) to the top (central beam).
6. To increase the stability of the edges, you can additionally strengthen them with props.
7. Sew up the resulting structure with polycarbonate using the appropriate mounting hardware. To ensure the necessary ventilation, it is recommended to leave a space of about 15 cm unstitched. To close it at night, an appropriate cap is made, which is fixed with loops in the upper part of the structure.
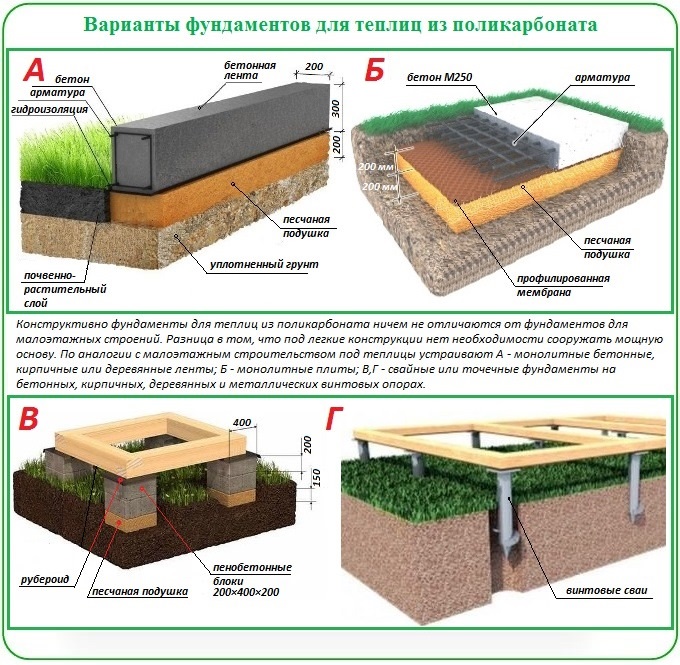
The use of the foundation makes the structure more durable and stable, prolongs its service life.
The foundation for the future greenhouse can be tape or any other. To create a strip foundation, you must:
1. Mark the dimensions of the base of the greenhouse, and then dig trenches around the perimeter 25-35 cm wide and up to 50 cm deep.
2. Fill the bottom with sand, and then with gravel to a height of 5 cm, tamp. Lay a waterproofing film on the prepared pillow.
3. Install the formwork using old boards for it, close the formwork with foil.
Attention! The foundation should rise at least 20 cm above the ground, forming a low base.
4. Install reinforcement and 4 corner fastening elements of the future structure (metal corners).
5. Fill the formwork with concrete and leave to harden for 2 weeks
Once the foundation is ready, you can begin to assemble the frame of the greenhouse.
The use of polycarbonate to create a pyramidal greenhouse allows you to:
The pyramidal shape of the greenhouse has its advantages compared to other types of greenhouses:
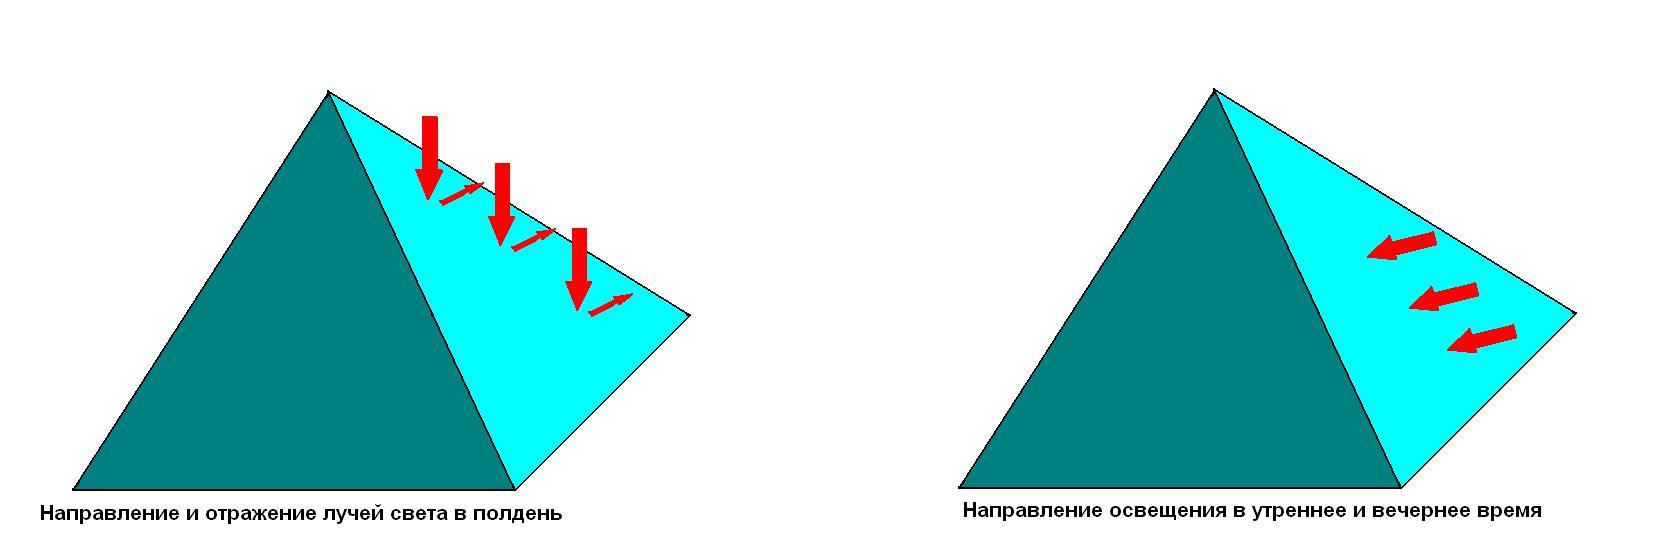
1. The pyramidal design allows you to absorb the maximum amount of sunlight in the morning and evening hours and reflect its excess in the afternoon.
2. The height and compactness of the design allows you to maintain an optimal indicator of air humidity, if you place a container with water inside it, thereby contributing to the active development of plants, protecting them from the appearance of certain types of pests and fungal diseases.
Attention! As noted, tomatoes in such a greenhouse are not subject to late blight.
3. Carrying out pre-sowing treatment of seeds inside the pyramid greenhouse, and then planting them, gives more friendly seedlings and higher yields.
Staying in a greenhouse-pyramid energizes and energizes
4. The microclimate created inside the pyramidal greenhouse helps to lengthen the growing season for plants. Vegetables and herbs grown in a pyramid greenhouse are distinguished by their excellent taste and early term maturation.
Attention! As the experience of gardeners in pyramidal greenhouses shows, the yield of radishes and cucumbers is 40-50% higher compared to growing the same vegetables in open field. Tomatoes and peppers ripen 2 weeks faster, and their fruits are larger.
5. The pyramidal frame of the greenhouse is resistant to snowfall and wind.
6. If it is necessary to create conditions for a short daylight hours, it is convenient to cover the pyramidal greenhouse with dark material.
7. It has also been noticed that gardening in a pyramidal greenhouse improves mood and improves well-being, energizes, relieves the feeling of fatigue.
Building a greenhouse in the form of a polycarbonate pyramid does not require more skills, time and material costs, so anyone can do it. Due to its compactness, it can be placed even in a small area. And high ergonomic qualities make its operation very effective.
In the temperate climate zone, special designs help to achieve rich harvests. And one of them is a pyramid greenhouse, the dimensions of which are calculated according to the principle of pyramids erected in Ancient Egypt. This amazing structure is able to concentrate a strong energy field, due to which the plants are distinguished not only by good yields, but also by disease resistance.
A greenhouse in the form of a pyramid creates a special energy favorable for plant growth.
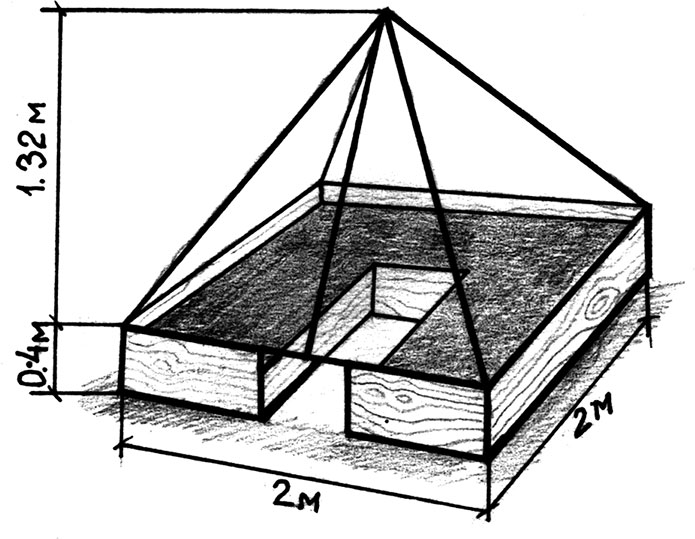
Today, greenhouses of this type are not as common as standard rectangular structures. Their design looks too complicated, but meanwhile you can make a greenhouse pyramid with your own hands. The main thing is to follow the rule of the "golden section": the ratio of the diagonal of the base to the height should be 0.62.
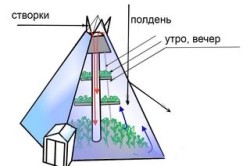
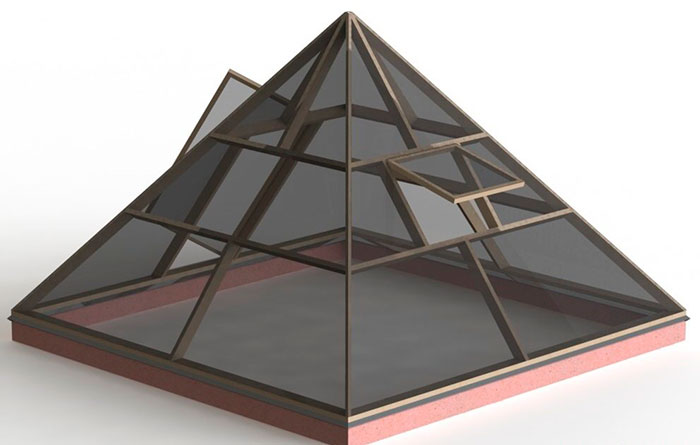
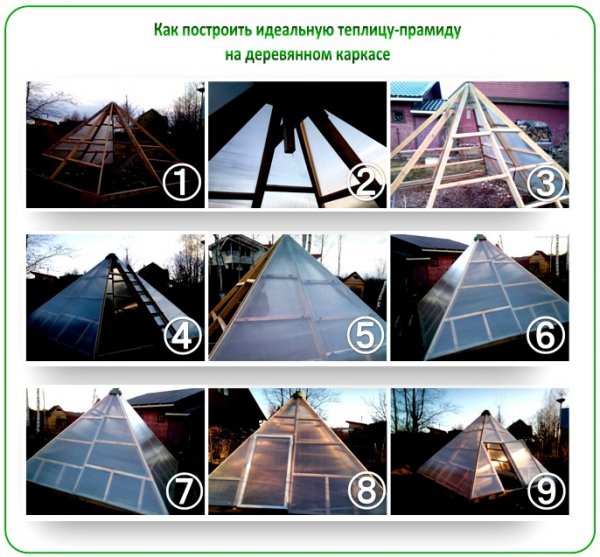
Figure 1. The device of the greenhouse in the form of a pyramid.
The pyramid design has a number of positive characteristics, such as:
Back to index
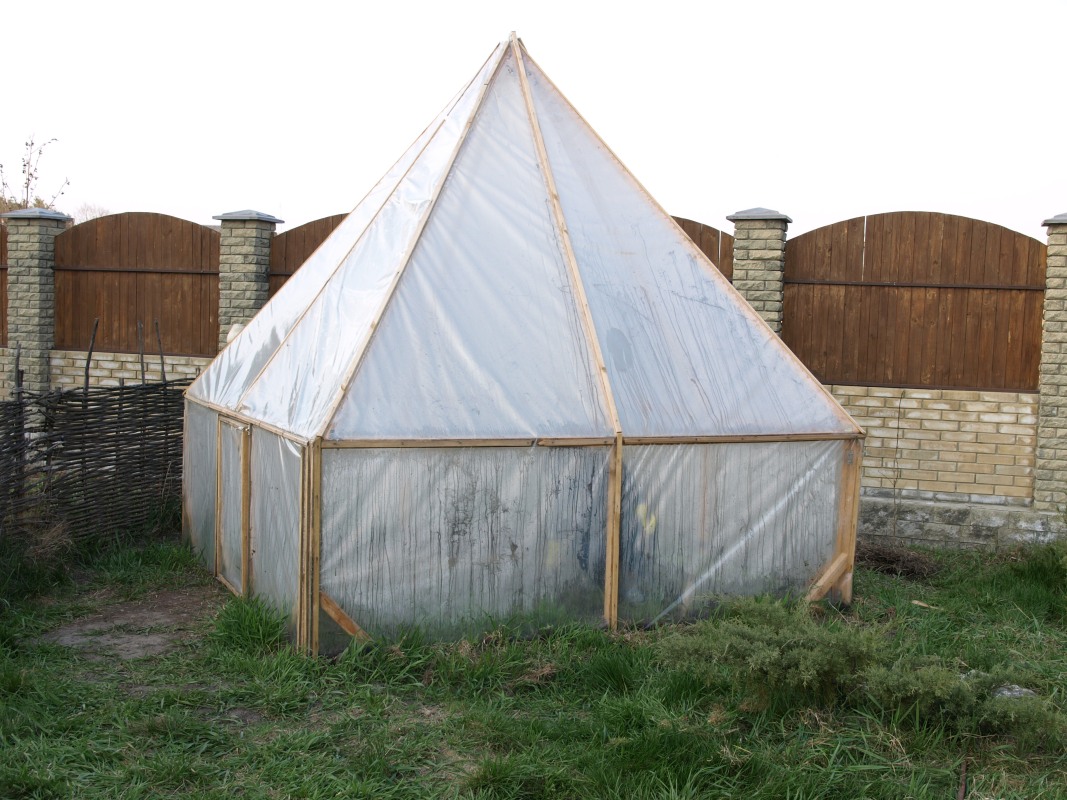
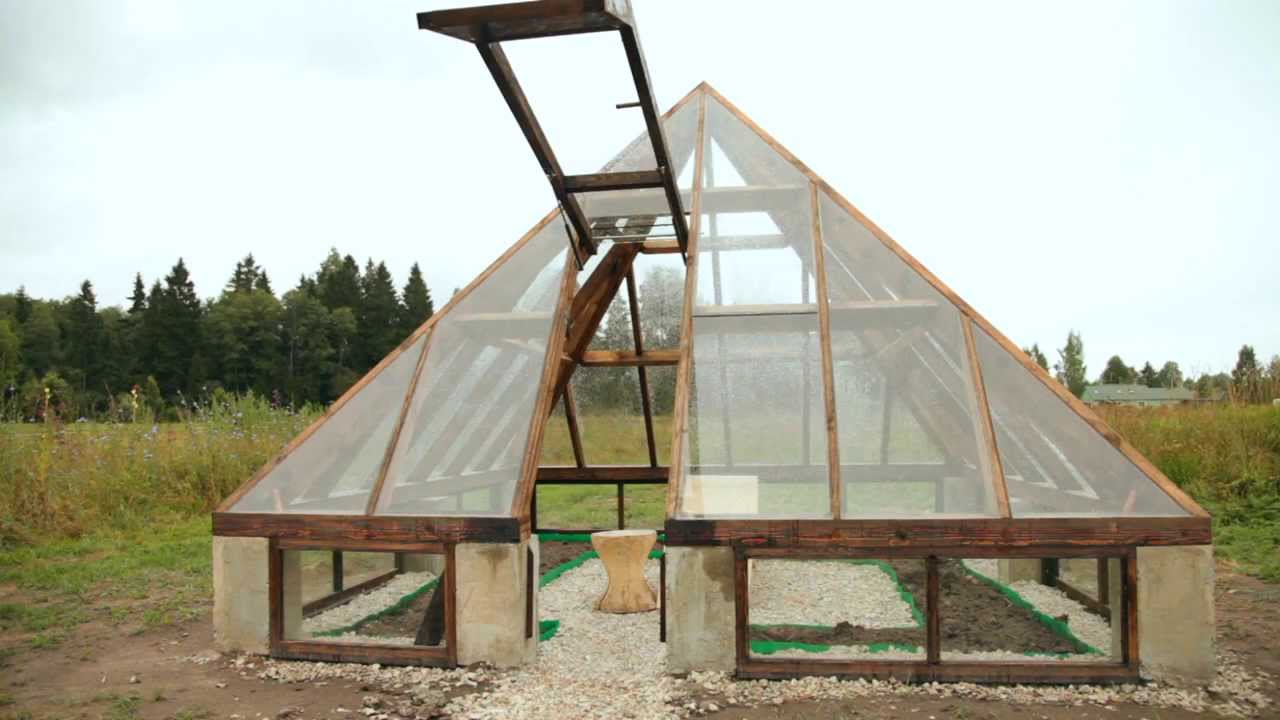
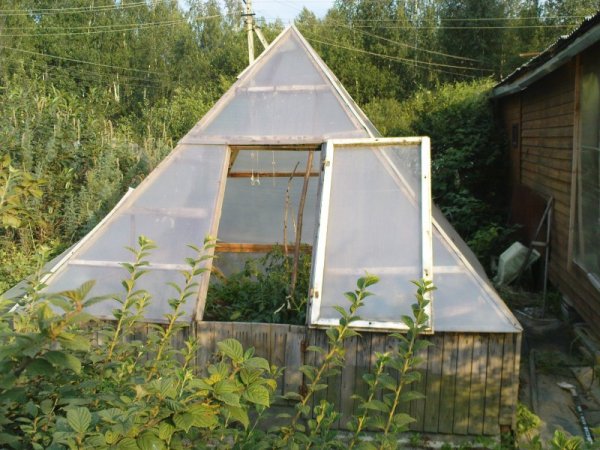
Structurally, the structure consists of 4 side frames connected together, mounted on a square base and covered with a film or polycarbonate. To give the frame additional rigidity, the frames are reinforced with wooden slats. In one of the frames there is an entrance door. For better ventilation on the opposite side of the door, you can build a window.
The dimensions of the greenhouse must correspond to the "golden section". Here you can make your own calculations or use already tested options. Many gardeners use the following indicators:
For independent calculations, a simple algorithm is used:
The drawings (Fig. 1) show how the pyramidal structure should look like. In this case, the ribs can be fixed on the base or stuck into the ground. Usually the height of the base is calculated depending on the height of the structure in a ratio of 1:3. So, a structure 3 m high has a base 1 m wide.
Back to index
With your own hands, you can build 2 types of pyramidal greenhouses: mobile or on a foundation.
The greenhouse should be oriented in a north-south direction to preserve the properties of the pyramid.
Mobile structures are convenient to use for growing seedlings. When the earth in the garden warms up, part of the seedlings is transferred to the beds. The other part can be left in the greenhouse.
To independently make a mobile pyramidal greenhouse, you will need:
First of all, the size of the future structure is determined and the site is marked. The base of the structure must be strictly square. Then the prepared tubes or bars are stuck into the ground at the corners of the marking to a depth of about 40-50 cm. The upper parts of the tubes are connected to each other above the center of the square with a wire.
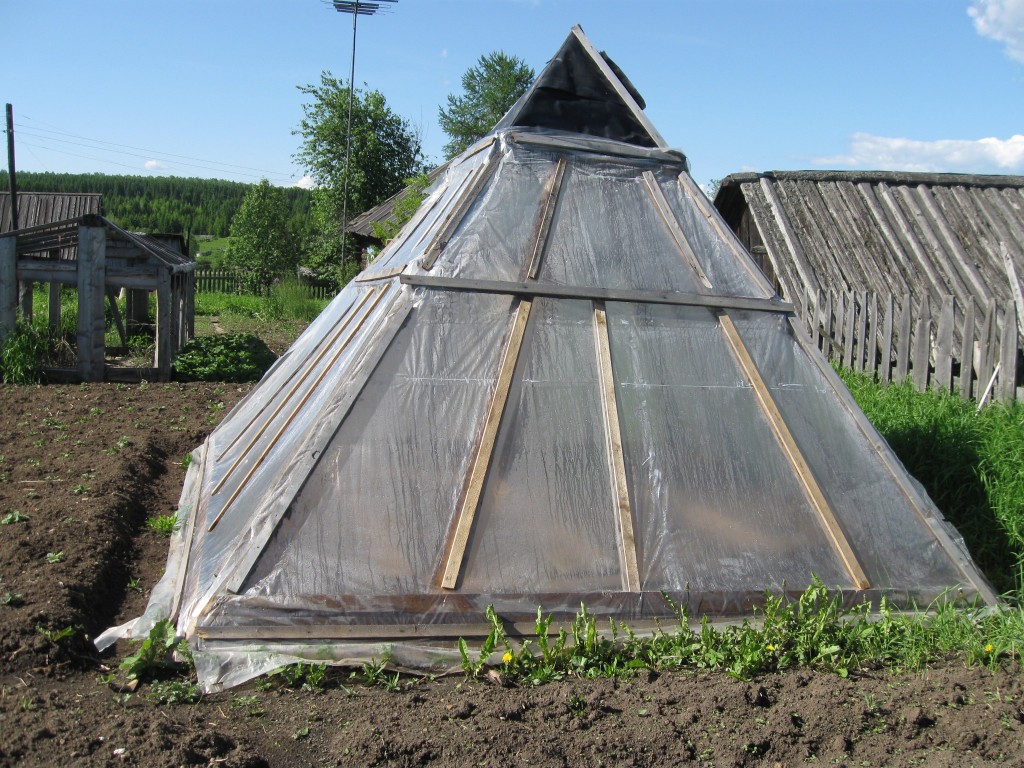
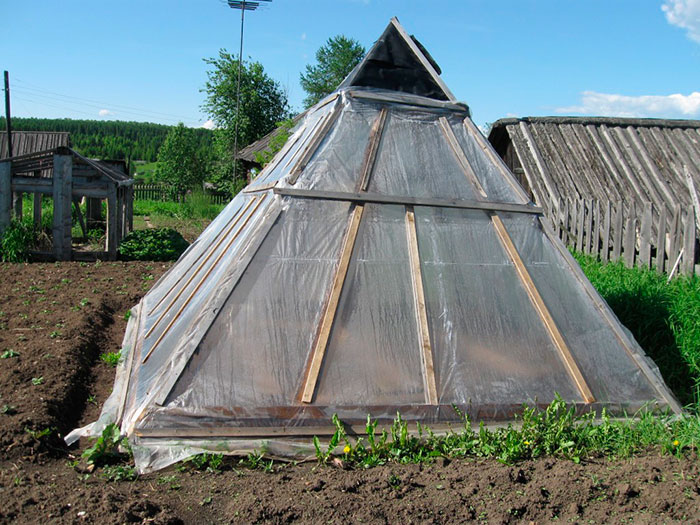
4 triangles are cut out of the film, which will serve as a coating for the side faces of the pyramid. At the bottom, the triangles should have a margin so that they can be pressed to the ground with boards. Already finished parts are attached to the frame with construction stapler brackets or special clamps.
An air vent is created at the top of the pyramid. To do this, the upper corners of the film triangles are bent to a height of about 10 cm. If necessary (frost, rain), the corners are bent and attached to the frame. One of the triangles must be fixed in such a way that it can be used as a door.
To achieve an excellent harvest, many gardeners build greenhouses. Such a greenhouse will allow you to get the long-awaited harvest a little earlier. Moreover, in such structures, several crops can be grown at once. Today, the pyramid greenhouse has become very popular. This article will tell you about what this design is, as well as how to build it yourself.
A pyramid-shaped greenhouse has the following positive characteristics:
In addition, inclined edges will act as a plus in such a greenhouse device. This allows you to achieve natural control over the amount of sunlight. The pyramidal design allows you to reflect a minimum of sunlight in the evening and in the morning, but in the afternoon they are reflected. As a result, plants grow in the most comfortable conditions for themselves.
This device allows you to control the humidity. To do this, it is enough to place a container of water inside the greenhouse. Another indisputable advantage that the pyramid greenhouse has is its mobility. For small buildings, it does not require pouring the foundation, which allows you to move them around the garden without much effort. Under it, you can even hide small trees from frost. In addition, such a greenhouse can also act as a kind of decoration for a vegetable garden or garden, complementing the country landscape of your home.
Before proceeding with the assembly of the greenhouse, it is necessary to determine its dimensions. Please note that if you have correctly determined the dimensions and drawn up a drawing, you can assemble such a greenhouse with your own hands in just half a day (they ate a medium-sized greenhouse and without a foundation).
The ideal cross section for a pyramid is 0.62. It is he who provides the maximum potential of the entire building in terms of energy. To get it, the greenhouse pyramid must have the following parameters:
Design calculation on the diagram
With such dimensions, the diagonal of the greenhouse will be 2 m. As a result, 200/320 = 0.62, which is what we needed. According to the indicated calculations, we create a drawing of the future structure, and we can proceed to its construction.
When all the necessary calculations have been carried out and the drawing is ready, we proceed to the construction:
Many experts recommend making four additional supports for each face. They will act as supports for the triangle sides of the pyramid. We make the entrance and the door frame from the south side. After that, the finished frame just needs to be covered with a film. You can also make walls out of polycarbonate. At the very top of the pyramid we make a cap (it will act as a ventilation window) or leave it about 30 cm open.
As you can see, making such a greenhouse with your own hands is quite easy and fast.
In a situation where you want to get not a portable greenhouse made of polycarbonate or film, but a permanent building, you need to make a foundation. It will also have to be filled in if the greenhouse device is large enough.
The foundation should be poured in the same way as for any other greenhouse. But here it must be remembered that the pyramid at the base must have a square.
The creation of the foundation is carried out according to the following scheme:
The result is a square foundation for the pyramid. Now you need to raise the frame in height. In this situation, the following manipulations should be carried out:
Then, at the base in the center of the pyramid, we make beds of slate. Their height is 80 cm. To prevent overheating of plants, the entrance should be made from the south side (as in a situation with no foundation). After that, we cover the resulting frame with a film or make a coating of cellular polycarbonate.
Thus, everyone can build a greenhouse in the shape of a pyramid on their backyard or garden. And what kind it will have (with or without a foundation) is already determined by you. Both devices have their own nuances in the assembly, but at the same time they do their job equally well.
This difficult task of any summer resident or gardener will not be so terrible after watching the videos that we have prepared for you. Check out all the secrets and tricks of this process. published
Join us at
Today can see practically on all private land.
Nowadays, these buildings may have not only the standard, square or rectangular form, but also more bizarre designs.
In most cases, the appearance of a structure of the original form in the garden is due to the fact that it the owner is trying to stand out from the rest, making the greenhouse attractive. Frames made in the form of small pyramids are especially popular.
In contact with
Greenhouses in shape pyramids, is a geometric shape that used in the construction industry already enough for a long time. There are many assumptions explaining their popularity and very wide distribution.
However No one of the most exact argument capable of explaining why pyramid-shaped structures have become part of many land plots intended for the cultivation of a variety of greens, as well as vegetables, strawberries and even decorative flowers.
This design has many very important benefits. The main ones are the following:
There are no disadvantages of such greenhouses..
As materials for creating a do-it-yourself pyramid greenhouse frame, wooden beams can be used, plastic, polycarbonate and even metal elements.
Polyethylene film is often used to cover the greenhouse. But you can make a polycarbonate pyramid greenhouse, that is, the outer covering of the structure. However some owners land plots cover their glass sheets.
Photo of a do-it-yourself polycarbonate pyramid greenhouse:
Before proceeding with the preparation of the drawing, need to size future building. In order for a pyramid-shaped greenhouse to be created according to all standards, the so-called “golden section” of the structure should be correctly calculated.
Greenhouse "pyramid", the dimensions may be as follows: the most the best option is structure 3.2 m high from the surface of the earth. In this case, the base should have the following parameters - 1.42x1.42 m with a diagonal of 2 m. As a result, the size of the "golden section" will be 0.62 m.
Do-it-yourself drawing of a greenhouse-pyramid:

How to build a pyramid greenhouse with your own hands? Having given preference to the greenhouse-pyramid, you need to remember that the structure should be installed only along the north-south axis. This is due to the fact that there are natural magnetic fields that have exactly the same direction.
According to verified information, vegetables in these greenhouses ripen a few weeks earlier ordinary. In addition, they are distinguished by juiciness, a more pleasant taste and large sizes. In addition, even severe frosts and various diseases and insects do not touch the plants that grow in this greenhouse.
The site for the location of the building should be in a completely open space, and not close to the trees. This will provide better lighting of the greenhouse on each side throughout the day.
Usually, a foundation is made under the greenhouse, which improves the stability of the frame. To date there are several varieties such foundations:
Foundation from a bar is considered the simplest construction technology. Its main advantage is that it is easy to assemble and then assemble.
The block foundation is characterized not only by high strength, but also by excellent waterproofing properties. He ideal for pyramidal greenhouses made of either polyethylene film or polycarbonate sheets.
Brick foundations are considered the most reliable. However, for them an additional layer of waterproofing is required placed between the base of the foundation and the frame.
A slab foundation is constructed from small concrete blocks directly connected to one or more drainage wells.
Step-by-step instruction manufacturing a greenhouse in the shape of a pyramid:
To increase the strength of the greenhouse usually do a crate, however this is not a required step.
Greenhouses mounted in the form of small pyramids, attract attention with their originality. They can become a real decoration of a private land plot. Such greenhouses are intended for growing vegetables, herbs, strawberries or flowers, so this is an ideal option for almost every occasion.
Useful information about the pyramid greenhouse in the video below:
In contact with
See inaccuracies, incomplete or incorrect information? Do you know how to make an article better?
Would you like to suggest photos for publication on a topic?
Please help us make the site better! Leave a message and your contacts in the comments - we will contact you and together we will make the publication better!
Numerous inventions of the 19th - early 20th centuries radically changed ...

Designed for online calculation of the ovulation period, favorable and safe days...

Every day, actresses and models look at us from television screens, and everyone, like one, ...